반응형

UIAnchor 노치 대응
NGUI를 이용하여 UI를 표현하고 있었지만, 최근 출시되는 기기들이 다양한 디스플레이로 나오기 시작했습니다. 이로 인해서 개발자들은 각각 상황에 맞게 대응을 해주어야하는 상황이 되었습니다. 펀치홀, 노치, 다이나믹 아일랜드 등 여러가지의 이름으로 개발자를 괴롭혀 왔지만, 유니티 2021.3 버전 이상부터는 SafeArea 클래스를 제공하고 있습니다. 이는 기기 화면에서 물리적인 화면의 영향 없이 온전하게 보이는 영역을 Rect로 확인할 수 있습니다.
이로써 SafeArea 클래스를 이용하여, UIAnchor 스크립트에 추가하여 안전한 영역에 앵커 자리를 잡도록 적용할 수 있습니다.
스크립트
UIAnchor.cs의 Update() 함수 안에, 아래와 같이 SafeArea 주석으로 되어있는 부분을 아래와 같이 추가해줍니다.
/// <summary>
/// This script can be used to anchor an object to the side or corner of the screen, panel, or a widget.
/// </summary>

[ExecuteInEditMode]
[AddComponentMenu("NGUI/UI/Anchor")]
public class UIAnchor
{
    void Update()
    {
    	...
        ...
        ...
        // Skip the code

        else if (container != null)
        {
            Transform root = container.transform.parent;
            Bounds b = (root != null) ? NGUIMath.CalculateRelativeWidgetBounds(root, container.transform) :
                NGUIMath.CalculateRelativeWidgetBounds(container.transform);

            mRect.x = b.min.x;
            mRect.y = b.min.y;

            mRect.width = b.size.x;
            mRect.height = b.size.y;
        }
        else if (uiCamera != null)
        {
            useCamera = true;
            mRect = uiCamera.pixelRect;
        }
        else return;

#if UNITY_2021_3_OR_NEWER
        //==============================================
        // SafeArea
        //==============================================
        if (side != Side.Center)
        {
            Rect safeArea = Screen.safeArea;
            ScreenOrientation orientation = Screen.orientation;
            if (container == null)
            {
                switch (orientation)
                {
                    case ScreenOrientation.Portrait:
                        {
                            // Top
                            mRect.Set(mRect.x, 0, mRect.width, safeArea.height + safeArea.y);
                        }
                        break;
                    case ScreenOrientation.PortraitUpsideDown:
                        {
                            // Bottom
                            mRect.Set(mRect.x, safeArea.y, mRect.width, safeArea.height + safeArea.y);
                        }
                        break;
                    case ScreenOrientation.LandscapeLeft:
                        {
                            // Left
                            mRect.Set(safeArea.x, mRect.y, safeArea.width + safeArea.x, mRect.height);
                        }
                        break;
                    case ScreenOrientation.LandscapeRight:
                        {
                            // Right
                            mRect.Set(0, mRect.y, safeArea.width + safeArea.x, mRect.height);
                        }
                        break;
                    default:
                        break;
                }
            }
        }
        //==============================================
#endif

    	float cx = (mRect.xMin + mRect.xMax) * 0.5f;
        float cy = (mRect.yMin + mRect.yMax) * 0.5f;
        Vector3 v = new Vector3(cx, cy, 0f);

        if (side != Side.Center)
        {
            if (side == Side.Right || side == Side.TopRight || side == Side.BottomRight) v.x = mRect.xMax;
            else if (side == Side.Top || side == Side.Center || side == Side.Bottom) v.x = cx;
            else v.x = mRect.xMin;

            if (side == Side.Top || side == Side.TopRight || side == Side.TopLeft) v.y = mRect.yMax;
            else if (side == Side.Left || side == Side.Center || side == Side.Right) v.y = cy;
            else v.y = mRect.yMin;
        }

        // Skip the code
    	...
        ...
        ...
    }
}
예제
 SampleScene.unity
0.08MB
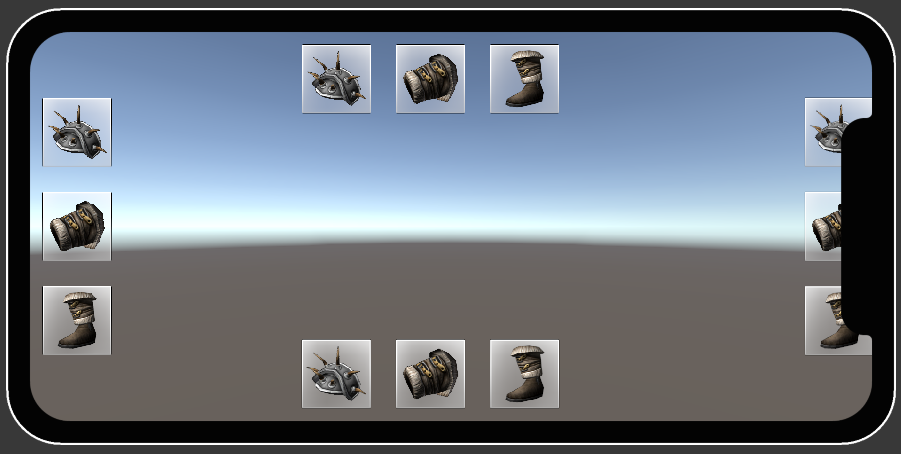
스크립트 수정 이후에 해결된 모습을 볼 수 있습니다. 노치, 펀치홀, 다이나믹 아일랜드 등 물리적으로 가려지는 부분을 피할 수 있습니다.
마무리
NGUI를 이용하여 UI를 이용하는 경우 도움이 될 것 같아 작성했습니다. 많은 분들께 도움이 됐으면 바랍니다. :)
참고 : https://docs.unity3d.com/ScriptReference/Screen-safeArea.html
반응형
'Utils' 카테고리의 다른 글
| Unity, Transform 인스펙터 커스텀 (0) | 2023.05.09 |
|---|---|
| NGUI, BBCode 태그 제거하기 (Replace) (4) | 2023.04.08 |
| Unity, 작업 중 Editor가 점점 느려지는 경우 (3) | 2023.03.18 |
| C#, 고정된 해쉬 값 가져오기 (0) | 2023.03.18 |
| Unity, 현재 입력된 KeyCode 가져오기 (0) | 2022.12.28 |


댓글